Lorenzo Capretto, Stefania Mazzitelli and Claudio Nastruzzi
Department of Chemistry and Technology of Drugs, University of Perugia, Perugia, Italy
Why is this useful?
The most common way to pump liquid into microfluidic devices is by syringe or peristaltic pumps. Syringe pumps are usually preferred for their ease of use and for the most accurate and stable control of the flow rate. In addition, syringe pumps allow the use of disposable and sterile syringes very much facilitating all the protocols involving cells that require sterile conditions.
On the other hand, syringe-pumps have the disadvantage that regulating the temperature of the pumped liquid is difficult. This feature is particularly relevant for a number of microfluidic applications when the temperature of one or more liquid phases, pumped through the chip, should be strictly controlled. For instance, manipulation of animal cells (movement, sorting or encapsulation) usually requires a maintained temperature of 37°C. Moreover many protocols involving the use of polymers or labile compounds need controlled temperatures either below 0°C or above 40-50°C.
We propose a tip that, in an easy and cheap way, solves the problem of temperature control when using syringe-pumps, no matter which type of microfluidic devices are used.
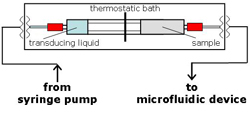
The general idea depends on the use of two coupled syringes (see Fig. 3B) acting as a pressure transducing system. The two coupled syringes, assembled as reported in the general scheme (Fig. 5), can be easily maintained at a fixed temperature by a cheap and flexible thermostatic bath, allowing liquid to be pumped into the chip at a constant, controlled temperature.
What do I need?
- 1-30 mL polypropylene syringes (Artsana, Italy)[1]
- Clips for conical joints KECKT (for 5 mL syringes use KECKT KC 14, Schott Duran, Germany, No.: 29 031 00)[2]
- Teflon® FEP Tubing, 1/8″ OD (Upchurch Scientific, UK; No.: 1523)[3]
- Quick Connect Luer Adapters, Female Luer to 1/4-28 Female (Upchurch Scientific, UK; No.: P-658)[3]
- Nuts, for 1/8″ OD tubing (Upchurch Scientific, UK; No.: P-345)[3]
- Flangeless Ferrules, for 1/8″ OD tubing (Upchurch Scientific, UK; No.: P-300)[3]
- Standard Polymer Tubing Cutter for 1/16″ and 1/8″ OD tubing (Upchurch Scientific, UK; No.: A-327)[3]
- Coping saw (X-ACTO, USA)[4]
- Thermostatic bath equipped with a DC10 Immersion Circulator (Thermo Haake, Germany, No.:426-1001)[5] and with a screw clamp for a plexiglass bath (15x40x15 cm)
What do I do?
The procedure below refers to the assembly of a transducing system based on the use of 5 mL syringes.
1. Saw or cut the plungers of the two syringes, one at 1.5 cm from the plug (sample syringe) and the other at 6.5 cm from the plug (transducing syringe).
2. Insert the longer plunger of the transducing syringe into the barrel of the sample syringe.
3. Fix the barrels of the transducing and sample syringes with a KECK clip.
4. Insert the Luer lock port for both transducing and sample syringes.
5. Place the two syringe assembly into the thermostatic bath.
6. Operate the system following the general assembly scheme reported in Fig. 5A.
References
[1] www.artsana.com
[2] www.duran-group.com
[3] www.upchurch.com
[4] www.xacto.com
[5] www.thermo.com


